Last time out on my Velocette Viper the clutch was “not what it should be” and remembering what the plates were like last time she was apart I decided on a re-line.
Since the plates were now some 50 years old I opted on fitting new plates rather than just replacing the Ferodo inserts in the old plates and so ordered the “kit” of new plates from Grove Classics<http://www.groveclassicmotorcycles.co.uk/>. The parts were ordered on Tuesday morning, delivered Wednesday morning! that’s service!!.
So it was out into the garage and start work.
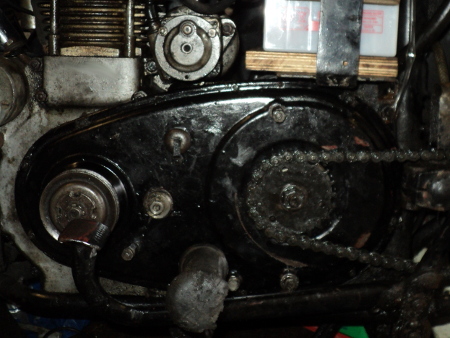
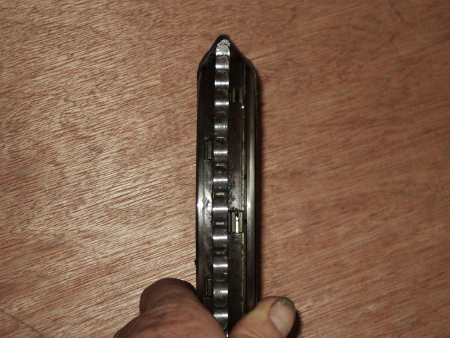
First thing is to clear the decks so it’s remove the dynamo drive covers and drive as well as the rear chain sprocket cover and the sprocket itself.
Velocette Primary Drive
Next is remove the screws holding the two halves of the primary chain-case together.
Last time it was down I used silicone sealer on the gasket and this time it’s proved a right swine to split the joint This time on re-assembly I’ll grease one face so it doesn’t happen like that again!.
Before I can split the case however I need to remove the dynamo drive pulley, this doubles as the nut securing the primary drive shock absorber and requires Velocette special spanner No. A220 to engage with the castellations of the nut.
A rake around the tool boxes found this, and its mate, the AS61/2AS clutch peg spanner.
After starting it with a blow from a copper/hide mallet on the A220 spanner the pulley was unscrewed and the chain-case split to give access to the clutch.

Primary Drive
On a Velo the clutch is unusual in it being on the sleeve gear and hence inboard of the final drive sprocket.
This is due to the Velo’s very narrow crankshaft and slim crankcases and this makes the clutch actuation different from the normal run of things.
Instead of it having only 4 or perhaps even 6 biggish clutch springs, each one in a separate mount on the top housing, there are 16 small springs, all in a mount at the clutch hub,
This mount however allows you to adjust the spring pressure on all 16 springs at once rather than having to muck about with adjusting each individual spring on its own, and this “spring hub” is lifted by an annular thrust race, similar to as in a car clutch.
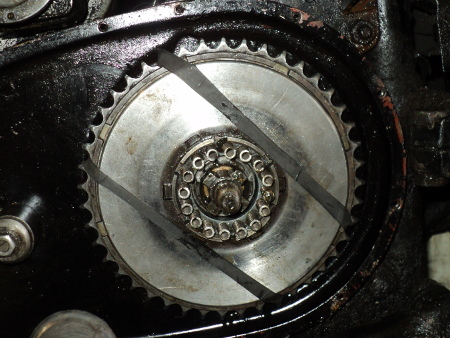
Clutch Spring Carrier
The hub piece is in two parts, the spring carrier itself, which screws into the clutch top plate and the pressure piece the springs bear against which doubles up as the clutch securing nut and screws onto the sleeve gear and secures the clutch back-plate.
There is a locking plate fitted to prevent this nut loosening off and which is secured by a small countersunk screw. so next step is to remove this screw and the locking plate, then by applying the AS61/2AS peg spanner, unscrew this clutch nut.
To do this though the primary drive has to be locked to prevent the clutch being turned by the spanner, but replacing the engine shock absorber will do this, engine compression being enough for the job.
On a “normal” clutch, when you remove the pressure plate its lifting piece tends to drop away and you then remove the clutch piecemeal.
On a Velo however, once the securing nut is undone, the clutch is removed in one piece and there are THREE lift pins going through the clutch backplate. These will of course drop onto the floor if you don’t watch for them!. (I snap a couple of rubber bands round the clutch assembly to hold everything together.)
Now you have the complete clutch assembly in your hands to take to the bench and work on in comfort.
Velocette Clutch on Bench
You just unscrew the spring carrier from the front plate and put it and the securing nut to one side for now.
Then you lift off the front plate, this is a machined part and not just a stamping as in most bike clutches.
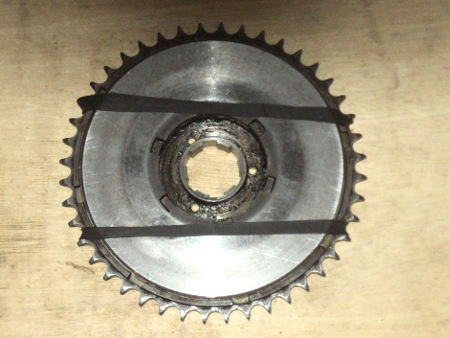
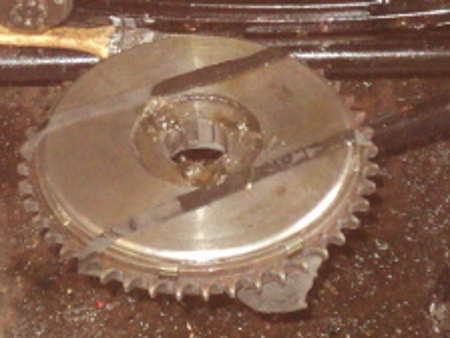
Below this is an insert plate, which tabs into the clutch drum, then comes a plain plate which tabs into the front plate, next again is the clutch drum and sprocket assembly.
The drum is formed on both sides of the clutch sprocket. which also carries a set of inserts and so acts as another insert plate.
On the gearbox side of the sprocket next comes a plain plate followed by an insert plate, then another plain plate, another insert plate and then the clutch main body/back-plate so you have a 9-plate clutch.
This whole assembly is only just over an inch thick! (1.070“ with the new plates!), a VERY slim assembly yet it will cope with the 140mph performance of a 500cc Thruxton Venom as well as it does the 90mph performance of my little 350cc Viper.
A Very Slim Clutch !
With the clutch apart it’s now a case of cleaning things and then re-assemble, this can be a bit fiddly getting all the plate tabs to seat in their respective grooves but once the body is assembled a couple of rubber bands snapped over will hold everything together.
Attention now is turned to the spring assembly, there are 16 springs, each 1.125” long by 0.275“ diameter,
I’m fitting new springs as well so it’s just take out the old and fit the new but if not then the springs need to be checked for distortion .
When you fit the pressure nut these springs must be able to slide against the underside of it. To facilitate this they do not bear directly against the underside of the nut, there are two shim washers interposed and these are lubricated prior to assembly so that while the springs bear against the lower shim, this can slide on the upper shim which can itself slide against the underside of the nut.
A bit torturous but this does work.
The pressure of the individual springs against the lower shim does tends to damage it so, while ideally both shims a should be replaced every time you remove the clutch, you can usually get away with just replacing one of them.
Then its back to the bike with the clutch assembled.
The three thrust pins have to be put into place, stuck there with a bit of grease and the body assembly can be slid onto the sleeve gear.
Thrust Pins in Place Ready to Fit
Next the spring carrier is screwed into place in the front plate until it bottoms onto the thrust pins, you can feel this happen as the clutch body will move on the gear. This is to give the maximum free length space to the springs.
The pressure nut can now be screwed onto the sleeve gear, there is a special tool for this but by setting the carrier as suggested it will normally allow you to do this with finger pressure alone.
Once the nut is started then the AS61/2AS peg spanner can be used to tighten the nut.
Now the rubber bands can be cut away and it’s just a case of refit the primary chain, (Don’t forget to fit the locking plate!).
Primary Drive Assembled
Then close up the chain-case and refit the engine shaft shock absorber along with the rear chain and sprocket. (The other end of the AS61/2AS fits the main-shaft nut.)
Once you’ve done all that, it’s time to set up the clutch.
First thing to do is to set up the spring pressure.
To do this, the first step is to totally disconnect the clutch cable so as to give maximum free play in the system.
You now have to screw the spring carrier out of the clutch front-plate to increase the spring pressure, to do this Velocette tool KA62/2 is used, a short length of ¼ inch steel rod with a flat on one end.
This inserts through the small hole in the gearbox sprocket and engages with notches in the spring carrier.
If the rear wheel is now turned forwards, then the spring carrier will be unscrewed from the front plate, moving it towards the pressure nut and so will increase spring pressure.
So you now turn the wheel forward a bit, then try the kickstart to test for the clutch slipping.
Repeat as necessary and spring pressure setting is correct when, as you press down on the kickstart against compression, the clutch will JUST begin to slip.
The clutch cable is now connected up again and all free play is taken out of it, this is setting up the unloaded position of the clutch lifting mechanism.
The spring carrier is now unscrewed further from the front plate until there is just over ⅛ inch free play in the cable.
By doing this you have increased spring pressure to where the clutch is no longer slipping under load AND when the clutch lever is released there is no load on the clutch release bearing.
The important thing to realise here is that, on a Velo clutch, the free play in the system is set up on the spring carrier, AFTER the release mechanism and NOT on the cable, before that system.
It does mean however that if you do not get that initial JUST slipping point correctly one way then, because that pressure is a bit low, the clutch can slip under load and if the other, the clutch will not clear fully and will drag, equally if you make a real mess up you can wind up with a clutch that will both slip AND drag!.
Setting it up it this way means that there is no load on the lifting mechanism when it is at rest, if there is then the clutch release bearing will be under load and will wear. Since this is a special, unique to Velocette, it is not cheap!! and as there is only some 5 thou clearance between each plate at full lift there is little room for error!.
Since I have assembled the clutch using all new plates, these will bed in over the first few mile so I’ll have to go through this full set up drill again after a couple of hundred miles.
All that’s left to do is refit the cover over the gearbox sprocket and the dynamo belt covers, fire her up and go for a ride.