Monthly Archives: July 2021

Lighting the Way

Last time I was out on the Velo I found that there was no charge registering. Once I got back home I found that the problem lay within the generator.

I still had the original generator on my Velo, a 6-volt Miller dynamo, which is very similar to the Lucas units more commonly fitted to most British bikes in the immediate post-war period.

These were a slightly upgraded version of the units fitted back in the late 1920’s which put out all of 36 watts at 6 volts!. The newer dynamos put out a nominal maximum of 60 watts reducing to about 45 watts at town riding speeds. This means that even with the newer unit the standard lights are low powered and give, at best, a 6-volt 36 watt headlamp!!.

Miller Dynamo

They are normally a fairly reliable unit but mine is now over 50 years old and has given up on life so I decided to bite the bullet and rather than having it rebuilt I would upgrade and fit a more modern unit.

There is a French made replacement for these old style dynamos which is a direct replacement dimensionally for the old dynamos and so will fit in the existing dynamo cradle and use the existing drive and give double the output. While these units are not cheap, nor is the cost of a rebuild of a dynamo and when you take the benefit of decent lights and add that to the cost of a dynamo rebuild then things seem much more reasonable.

Alton Generator

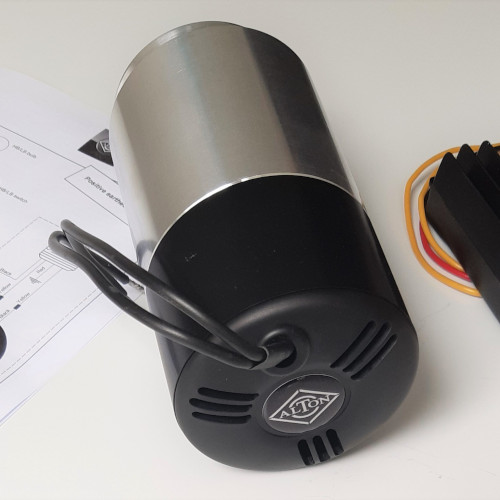
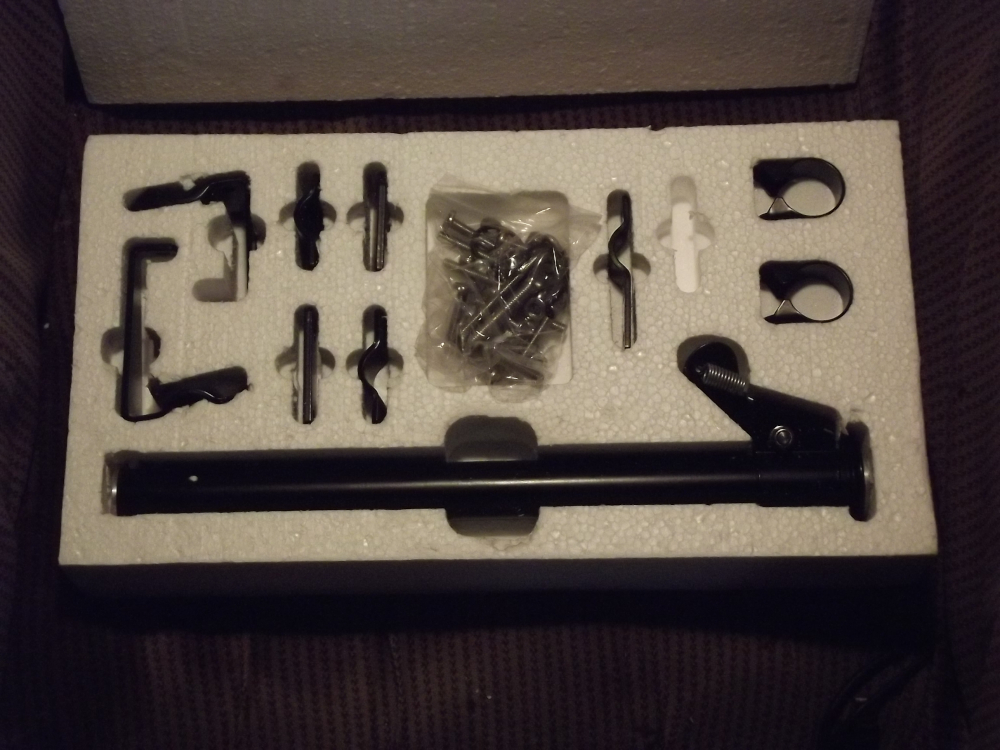
So I contacted my Velo parts supplier and ordered one of these “Alton” units, because it is an alternator rather than a dynamo it also requires a regulator/rectifier unit but this came as part of the package and is a standard “Podtronics” unit rather than a special so that fact may be useful later as I can also use it on the big Panther by changing the drive pulley.

Despite the postal hold ups it was delivered within two days, now I’ve just to get round to fitting it!!.

Owing to monsoon conditions this was put off for a while but did not prove difficult.

First thing was to disconnect the battery before starting to remove the old dynamo.

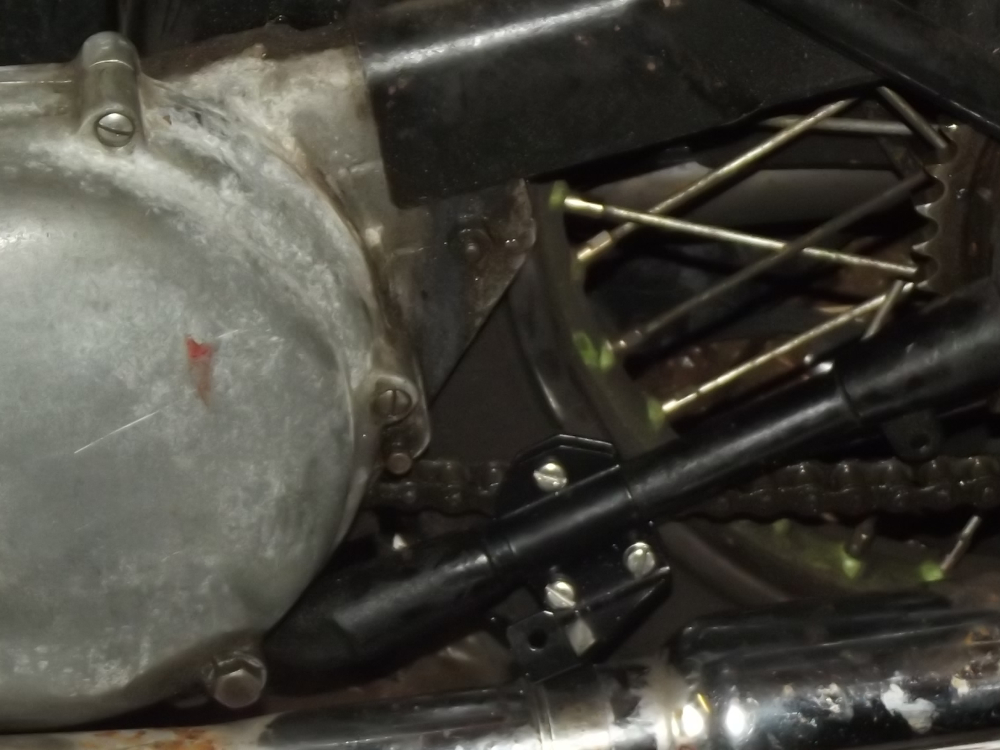
I removed the drive belt cover (for those not familiar with a Velo the dynamo is driven by a V-belt off the engine shaft shock absorber). Next was to slacken the nut on the end of the dynamo shaft before removing the drive belt.

Next off was the dynamo drive pulley, this has to come off because otherwise it blocks the removal of the belt drive inner cover which is next to come off, and then there’s only the dynamo clamping bolt to loosen off and the dynamo can be slid out of its cradle, not forgetting to undo the wiring cables from the dynamo.

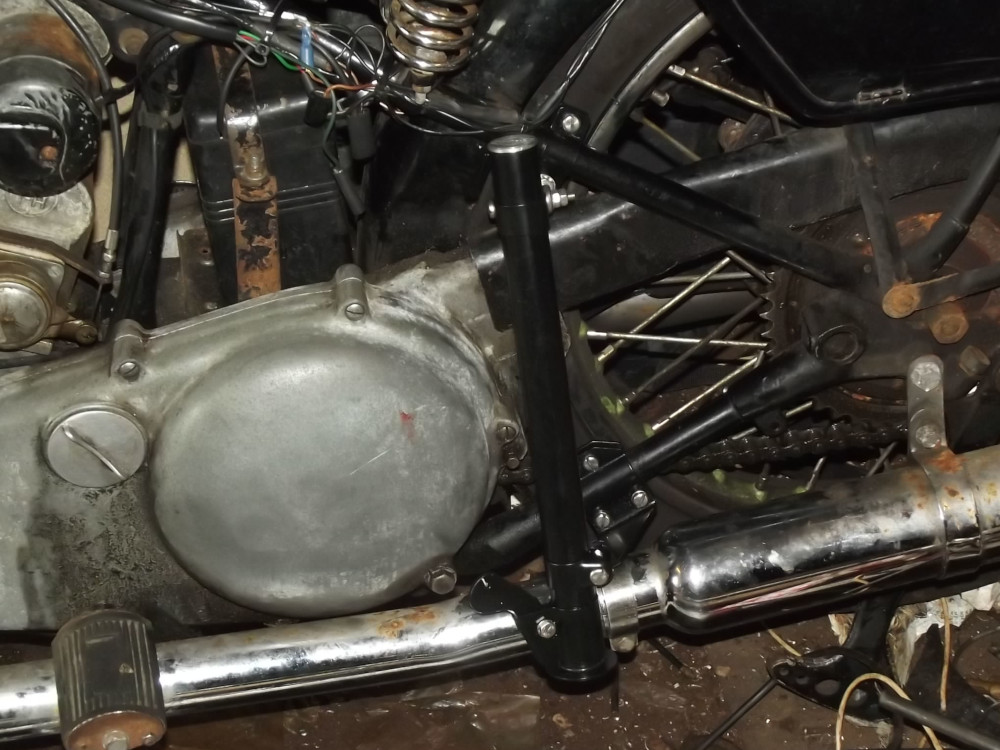
The ‘Alton’ unit can now be slid into the cradle in place of the Miller and the belt inner cover fitted and the drive pulley fitted.

It is important to get the drive pulleys in line, otherwise you’re liable to have the belt jump the pulley or, at best, wear badly. Simple way to do this is to take a length of 6mm round bar and put a right-angle bend a couple of inches from one end.

If you now hook this into one of the pulleys then the free length gives straight line along the required drive line and so can be used to line up the two pulleys.

Once the pulleys are in line then all that’s left here is to fit the belt and set its tension by rotating the generator in its cradle.

Now we get complicated, it’s time to fit the reg/rec unit.

On the later Velos such as mine the regulator is fitted onto the rear mudguard, under the saddle and, nicely out of the way.

Looking for somewhere unobtrusive to mount it I settled – – – – on the rear mudguard under the saddle, where the original unit lived.

This has the advantage that I can utilise the existing cabling to connect the reg/rec into the bikes systems.

There are a pair of leads from the generator which match up to two of the leads from the reg/rec.

Of the other two leads from the reg/rec, one goes to the main ground point, which is under the tank anyway and the other is the power lead going up to the main switch.

Once everything was connected up and checked all to be working that was it and I now have the advantage of being able to run a decent headlamp rather than having to rely on just a time-served glow-worm in a jar.

Why did I go for the upgrade?. Well the Velo is still a practical road machine, it was about the top rated sports bike of its generation and is still well capable of coping in modern traffic. Its weak point was the low powered 6 volt lighting system.

With this new generator I now have a 12 volt system with good lights, in fact because the bike has a magneto and so no power demand to run an ignition system, I have power and to spare to run a spotlight as well if I so wish.

Before the conversion, if I was out with lights on I needed to really be above 40mph to keep the battery charged, riding at lower speed, as in towns, meant the loads did not balance and the battery would gradually drain down. Not only that but the lights were low powered, now I happily run a standard QH headlamp and can SEE where I am going after dark.

A Bit More Support.

A downside of using the Panther as a solo is that, being a rigid-framed machine she does not have a centre stand, any time you stop it’s a case of working your way to the back and heaving her up onto the rear stand. While this stand does have a “Roll-On” foot it’s still a hassle.

Unfortunately Panther never supplied a side stand for their machines and because they do not have an underframe it is not possible to fit one of the after-market “clamp-on” universal fit side stands.

However, between the wars there was a stand available that could be used and there is now someone manufacturing these once again.

The stand in question is the “EsWay” and a modern version is available as the “Vintelle”from Mick Hall Engineering in Otley.

CREATOR: gd-jpeg v1.0 (using IJG JPEG v80), quality = 90

1928 Advert for Esway stand

I made contact with him to enquire as to its suitability for an M100 Panther and discovered that his first one had actually been fitted to an M100 so I ordered one up, this was late on on Tuesday so the order would be processed on Wednesday. It was delivered on Thursday morning!

Packed stand kit

The stand came better packed than just about anything else I have bought on-line, putting the standard Ebay and Bangood efforts to shame, along with a comprehensive fitting guide, so it was out to the garage and get on with it.

The stand fits across the rear sub frame, as far forwards as is practical, about level with where a centre stand would fit. It comes with various fittings to suit a wide variety of machines so first thing is to sort out the best ones for your purpose, then a re-read of the fitting instructions before lifting the spanners!.

As the Panther has an exhaust on either side I selected the lower mount with the greatest stand off and assembled it loose onto the lower chain stay and attached the stand to it.

Lower bracket mounted on bottom chain stay

There’s a choice of two upper mounts in the kit so next thing was to see which was needed.

I extended the stand to make sure it would clear the nearside exhaust and made my selection to suit, fitting it round the upper chain stay.

All that was left to do was to snug everything up and make sure the stand foot had clearance and that it was clear of the ground when the bike was laid over into a corner, not a good idea to have it fouling!.

Upper bracket goes onto upper chain stay and stand mounts across the brackets.

The only criticism I have is that the mountings supplied for it are slotted pan-head set screws, I would have preferred to see Allen cap screws or even just simple hex head bolts, a minor niggle when all is said and done.

A Bit Off The Side.

With the way things are at present I’ve taken the sidecar off the R12 to ride it as a solo for a while.

This is not a difficult job, worst part is manoeuvring the detached sidecar around.

All it takes is to slack off the two bell clamps, remove the bolt through the upper clevis of the upper brace, unplug the lights and I can wheel the sidecar away, not even a ten-minute job!.

When it comes to replacing it things are just as easy, and because of the design of the sidecars fittings I will not have to re-align things, it literally just plugs straight back on.

However, taking the sidecar off brings with it another problem, but it’s one I would have had anyway, Tyres!

Both tyres on the old lady are a bit worn and are well past their “use by” dates, so it’s been onto the Internet to see what is available.

With the old girl having been built back in 1940 she runs on the old imperial sized tyres. While these are still available choice is a bit limited.

Strangely enough, if I wanted sidecar use tyres it would be easy because suitable tyres are still in production because they are used on pre-war cars such as the Austin Seven. Being a sidecar tyre though they have a flat profile and that does not give good handling on a solo machine.

A rake around the Web turned up some options using modern tread patterns, not ideal for use on a vintage bike, and then I found a MITAS tyre in the correct size and with an older profile, one more suited to the age of the bike.

These are of East European manufacture and while possibly not really suitable for use on a modern “crotch rocket” they are perfectly adequate for use on an elderly side-valve machine like the R12, so it was out with the card and order up a pair, along with new tubes and rim-tapes.

Even with current hold-ups delivery only took a couple of days and now it’s just a case of fitting them and now is an ideal time as the current heat wave heats up the new tyres and make them more supple and easier to fit.

When it came to removing the old tyres they showed their age, you could just about strike a match on their side walls they were so stiff and hardened!, I was glad of the extra tyre lever I had bought some years ago that’s almost half as long again as the standard ones that came in the R80 BMW’s tool kit!.

I fitted new inner tubes and rim tapes while I was at it, after all the old ones had been in there for some 30 years now, I checked the date code on the old tyres, 1984! they were well time expired even if they did still have reasonable amounts of tread left.

The new tyres went on easily as they were warm, I cleaned up the rim bead areas, soaped the tyres beads inside and out and did not need the levers to mount them, the one bead slipping on with hand pressure and the other being “walked” on. As soon as the new tyres were fitted I put about 40 psi of air into them and bounced them all round their perimeter and the beads snapped home without any problems.

Then it was just a case of adjust the tyre pressures and refit the wheels.