
When I started this blog it was to cover the rebuild of my M100 Panther. Well this bike has now been back on the road since the turn of the year and now that most of the initial snags seem to have been sorted out there’s not been a lot to say lately
Once I have a few more miles under her belt I intend to fit a sidecar so I’ll be covering that but for now all that’s happening is that I’m racking up some miles on her..
SO – – – I’m going to broaden things out and take in the happenings with other bikes as well, and the first is a problem that appeared out on the road last Saturday on the R850R BMW.

The Patient
Standing at traffic lights and suddenly the tick-over went all to pot, pulled away but obviously only one cylinder working properly, although both were firing.
On checking things over I found that one end of the return spring on the right hand injector’s butterfly valve had broken off.
Since I always have some Viney bands with me (rubber bands cut from an old inner tube) I was able to codge things up so I could ride home.
I went to the local BMW emporium on Monday only to find that the spring was not listed as a spare! Delightful!.
Fortunately I have a spare injector body, a known wear point is the butterfly shaft on the right side and I’d taken the chance of getting a good used one when I saw it a couple of years ago. As the body fitted is showing signs of this wear now is the time for this to be fitted, HOWEVER, there are two O-rings involved so rather than re-use the ones currently on the bike I ordered up a new set, “delivery due on Wednesday”.
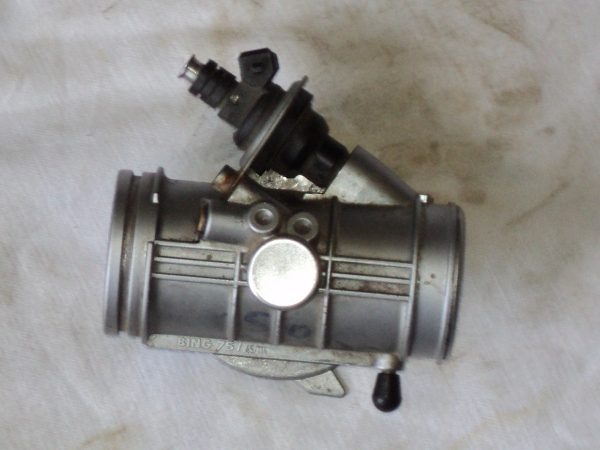
Replacement Body
In the meantime I gave the cable adjuster a good dose of penetrating oil so it had a couple of days to soak.
Once I’d picked up the parts it was time to start so first thing was to disconnect the injector body from the fuel line and the electrics.
For the electrics it’s just push in the wire clip towards the body and the connection pops apart, you’d never think it had been undisturbed for the last 12 years!. A touch of silicone grease on re-assembly will help keep it this way.
To detach the fuel line meant pulling out the spring retaining clip and then pull the connector off the injector, this was a bit stiff, probably through the O-ring having swollen a bit from contact with our modern ersatz petrol.
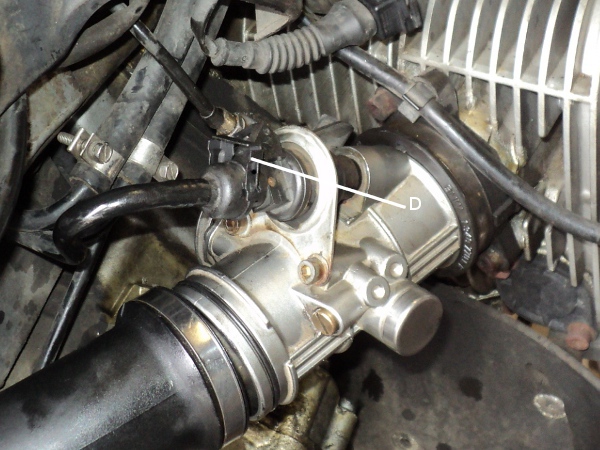
Removing the fuel feed line. “D” is the spring clip.
With these clear I now had easy access to the throttle cable so a 10mm spanner on the lock-nut and the adjuster was free and unscrewed from its mount.
Then having slackened the clamping screws at either end of the tube to the air-filter that tube was slid back into the air-filter housing.
All that was left then was to slack off the clamp screw at the cylinder head and the body came free, except for the throttle cable at the pulley sheaves but this was easily dealt with with the body free.
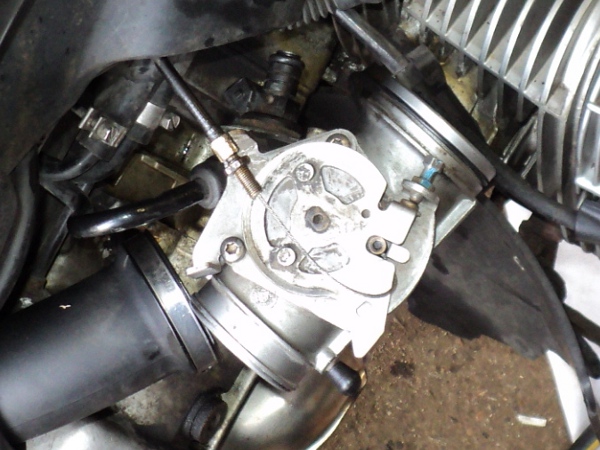
Removing cable from pulley sheaves
As I had decided to use the known quantity of the old injector this then had to be swapped into the new body, the removal of two Allen screws saw the injector come free.
Before I fitted the new body however I took the opportunity to remove and clean the pilot needle valve (No.2 on the picture below). This controls tick-over and tends to get gunged up so it should really be removed and cleaned every major service.
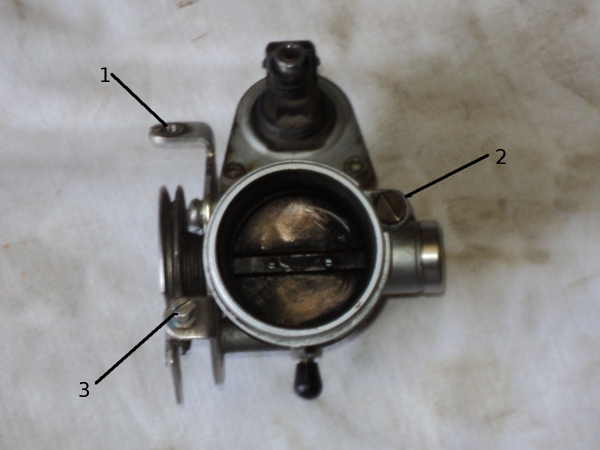
Injector body adjustment points
I also took the opportunity to clear the cable-adjuster threads that screws into position “1” so the lock nut could spin free for the full length of the adjuster, these adjusters are threaded “Metric Fine”, being 6mm x 0.75 pitch so don’t just shove a standard 6mm tap through to clean things up since that’s 6mm x 1.0 pitch!
Then it was just a case of reverse the dis-assembly procedure and get everything back together again.
I fitted new O-rings to the body and the injector, giving them a wipe over of silicone grease first so they would slip easily into place, and while I was at it I renewed the spring retainer clip for the fuel line.
-
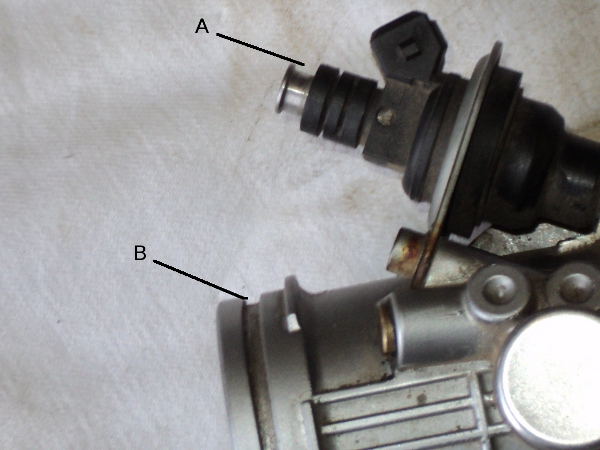
A and B show where the O-rings go
I now had to synchronise the two bodies as the throttle cables had been disturbed and the tick-over needle needed setting.
To do this job properly the motor must be up to full operating temperature but a basic set-up can be done cold.
Main thing is to get the butterflies moving together and an “eyeball”check will suffice initially.
All you do is put a finger onto one cable sheave and watch the other, open the throttle slowly with your spare hand and then adjust the cable until both start to move together. While not exact it’s close enough to let you run the bike enough to get it warmed through.
There are three adjusters on these throttle bodies:-
No.1 alters the free play on the throttle cable and is used to synchronise the opening of the throttle butterflies.
No.2 is the bypass needle and adjusts the tick-over, the adjustment is on an air bypass circuit, fuel flow is controlled completely by the injector and this bypass is to match the air volume to it.
No.3 is the butterfly stop. This holds the butterfly a fraction open to allow the motor to tick-over. This is factory set and should NEVER be altered by the user, fine adjustment of the airflow is by use of No.2, the bypass needle. The butterfly stop is set up by the manufacturer on a gas flow bench.
Injector body adjustment points
For the tick-over screw, a basic setting is of around 1.25 to 1.5 turns open that will again be close enough to let you run the bike to get it warmed through when you can adjust it properly.
This setting up is done using a manometer, the official BMW tool is an electronic version of this tool but the lod “analogue” instruments can still be used.
The sensor tubes are connected to the vacuum take-off points on the throttle bodies and the engine started.
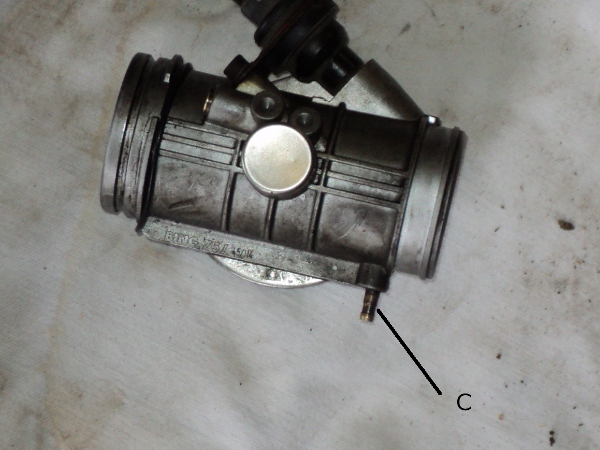
“C” is the vacuum take-off point
With the engine running on tick-over the bypass needles are set so that the manometer levels are both the same and tick-over is about 1200 RPM.
To adjust the cable balance the throttle is then opened and held at around 2000 RPM and the free-play adjusted so that both sides show equal on the manometer.
Once you think you have everything set right then you “blip” the throttle a few times and then check the tick-over and cable balance settings again, all being well they are still OK and that’s the job done!