Last time I went to go out on the Pussy I found the battery was nearly flat.
Due to the risk of interfering little fingers switching the lights on in the garage I always disconnect the battery when I park her up, there’s a quick-connect there for this very purpose, so I realised something was wrong.
Once she was fired up I switched the lights on and revved her up, sure enough the ammeter showed a steady discharge and the lights did not brighten up, the dynamo wasn’t charging!.
So it was down to the garage today with meter and tools.
Main suspect was the dynamo itself, it being both elderly and a product of the Prince of Darkness.
First thing was to uncouple the drive, this meant removing the dynamo chaincase and then the dynamo itself, not difficult but fiddly, the electrical disconnect was easy, just take out the lock-screw and plate, pull out the two “plug” connectors and I soon had the dynamo on the bench.
First to be checked were the brushes had they stuck in their holders?, were they contacting the commutator?, what was their insulation like?, how about their connections? All seemed well here.
Next I put a piece of paper between each brush and the commutator and tried the meter across them, maximum ohms as it should be, check each brush to earth, one was virtually nil ohms and the other maximum, again as it should be, removed the pieces of paper so the brushes were in contact with the commutator and measured across the brushes, a low ohms reading so that’s OK, try two or three other positions round the commutator and the readings were the same so that side of the dynamo seemed OK.
This left the field coil so I put the meter across it and found a low ohms reading, as it should be, so I tried the meter across the coil to earth, found the same low reading and promptly thought I’d found the fault in the coil shorting to earth.
I then realised that one end of the coil was MEANT to be connected to earth so I disconnected that end, tried again and got a maximum reading so the coil checked out.
Since the dynamo checked out electrically I next tried a quick and dirty check, if you connect a battery across a dynamo it will run as a motor, this is not an absolute check, since while if it doesn’t motor then it’s definitely U/S the fact it will motor is not a guarantee of it being OK, just an indication that it probably is .
To motor a LUCAS dynamo you need to connect the “D” and the “F” terminals in the dynamo together and connect them to the live side of your battery, connect the other side of the battery to the dynamo casing and it should spin over and mine did, so, taking the electrical checks along with the dynamo motoring the dynamo seemed OK.
Next to check was the regulator and to access this meant the saddle had to come off.
So it was unbolt the saddle springs, remove the front pivot bolt and lift it away, much easier to say than to do!
The regulator is bolted to the saddle support bracket so that was next and I had the regulator loose in my hand.
The fault was immediately apparent, a broken wire!.
The brown lead to the “A” terminal had broken just where the inner wire leaves the insulation, it was being held in place by the harness but was not making a connection.
The “A” lead is the one taking power from the regulator forward to the ammeter and hence the main switch and from there back to the battery so it’s not surprising the battery was flat.
The connection was soon remade and then everything had to go back together again.
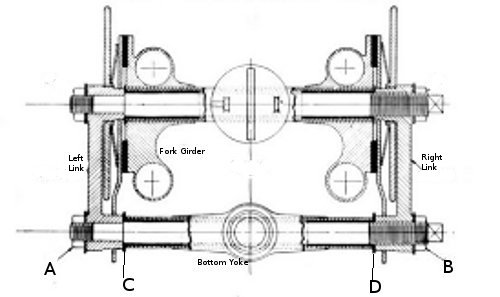
As a point of information, the connections to the regulator are usually in the order “F” “A” “D” “E”, that’s Field, on Panther that’s the green lead, “A” goes to the Ammeter and gets the brown lead, “D” goes to the Dynamo and is the yellow lead and the black Earth lead goes to “E”.
Some of the late pattern post-war regulators had them in the order “D” “E” “A” “F” but a quick look at the wire colours tells you, the only ones I’ve seen like this were the late pattern rubber mounted regulators with the crimped on aluminium casing.