Monthly Archives: December 2013

First Time Out

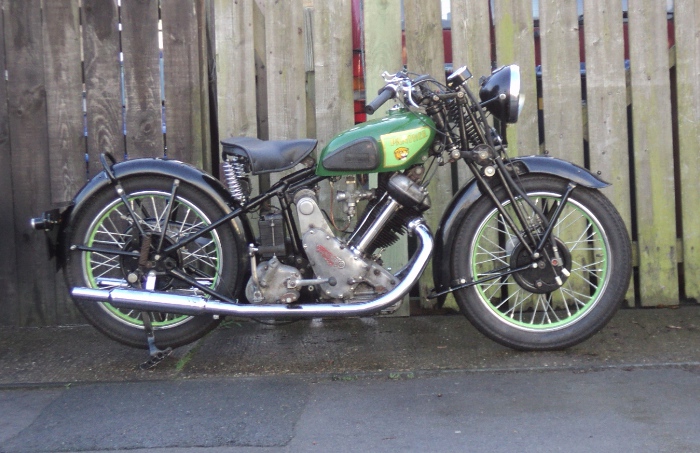
As it was reasonable weatherwise today I decided to bite the bullet and try the old girl on the road.

So I kitted myself up and brought her out of the garage.

Expecting a bit of effort in starting her I put my helmet and gloves on the ground, turned on the juice, full choke, about 1/3 advance and wound her over twice to prime.

Then it was find compression and ease her over it using the valve lifter, give a “long swinging kick” and what do you know! — she starts and runs first kick!.

So I set her down to half-choke and her let warm up until she’d tick over reliably then it was put on my helmet and gloves and take her off the stand.

I went to change into first gear and found the first snag, the gear pedal is too high!.

So it was reach over and hook it into gear with the back of my heel, I can’t set the pedal further down on its splines as it will foul on the exhaust so some “adjustment” to the lever will be required.

G-R-A-U-N-C-H,  The clutch was dragging!, well I think best thing for that will be new springs and re-set up with those, it was a fiddle getting an even lift with the ones I used.

Still I was in gear now so it was ease the clutch and pull away.

I went to change into second and had to take my foot off the rest to work the pedal, definitely looks like I’ll have to “adjust” the lever so it will clear the pipe!

Okay, next thing I was coming to a “T” junction so it was gear down and brake, H’mm brakes weren’t as good as they seemed on static test, maybe they just need to bed in —  or perhaps a reline is in their immediate future — not only that but I can see the coupled brakes will take getting used to.

Junction was clear so it was just roll through the turn, retard the ignition a little and throttle up, engine note deepened and she pulled strongly away as I eased on the ignition advance, I’d forgotten the feel of the torque on a big Pussy!.

I pulled into the petrol station a mile down the road and put a gallon of juice in.

The bike had been running so well I decided I could put up with the gear-change for now and would put a few more miles under her belt.

So it was going round roundabouts, swinging through bends and enjoying using the sheer slogging power to pull me round them, she responded well to use of the advance lever and on the hills just “settled into the harness” and pulled on up them.

I can recall it being said in a magazine somewhere, somewhen, that a Panther might only have 26 horsepower, but these were real horses, ones with shaggy legs! (was it Titch Allen said it?, sounds like one of his comments).

I was really enjoying things until, about 12 miles out from home she lost power and I had to stop.

She turned over easily with plenty of compression so the mechanicals seemed OK. Plenty of fuel in the carb, was it electrical?.

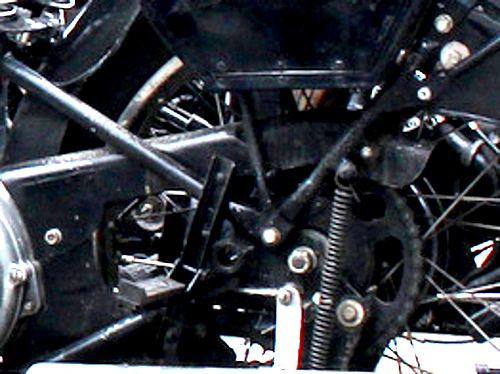
A bit of checking of the magneto and it turned out that the magneto coupling had slipped on its taper!, if you prefer it, the timing had slipped.

Strangely enough, the first time I was out on her some thirty odd years ago the same thing happened but that was with a Lucas N1 mag and not the BTH unit she’s wearing now.

Fortunately I was within a mile of a friends house so we soon got her up to his place, he ran me home and I came back with the van to pick her up and spend a couple of hours chewing the fat with him.

Bit of a downer finish to the ride out but given about an hours work tomorrow and I’ll have her running again, I’ll lap the tapers to make sure of a good fit and clean them with a solvent cleaner to make sure the cones are absolutely clean.

It was a real pleasure to ride her again after all the years, the way she just digs in and pulls when you ask her to accelerate, the feel of riding the torque curve of the motor rather than the power curve, the lazy feel of a big, slow revving, under-square single.

I can see riding this old lady being addictive! While she’ll not be a motorway bike but she will revel in the twisties of the older road system, but after all those are the roads she was built for.

There’s Life, Jim!.

Well the last stages are to fit the final drive chain-guard and to set up the dynamo.

As there was no chain guard with the bike when I got her I had to see what I could do.

Rear Chainguard

Panther Rear Chain-guard

On checking photo’s of other machines of this period I found that it was a bit of an odd ball in that it had a flare up at the rear end. Needless to say this part is one that is not listed in the Panther Club’s spares scheme so I would have to make do.

As it happens the old lady has a stable-mate, a late model Velocette, and on checking my parts cache for this I found a damaged rear chain guard, it having the rear end almost completely broken away.

On offering it up to the Panther it was immediately obvious that no way would the Velo mountings line up with the Panther’s, not only that but the guard was too long.

Measuring it up soon showed that if I cut the guard at the front mounting bracket it would be the correct length so that got rid of one problem completely and half of the other.

The rear Velo mount is a bracket welded to the guard that picks up onto a mount on the Velo’s rear swing arm, but the Panther has a rigid frame, the mounting lug for the rear of the chain-guard is on the mudguard-stay and would not match the Velo bracket.

But the Panther mount matched onto the guard itself so I decided to just remove the bracket and get a nut welded onto the cover at the correct point, using a set bolt to retain it.

Another snag was where the rear frame stay came across the guard as it needed a recess formed in it to give clearance but a little careful work with a cross-pein hammer soon cleared that problem up.

So after getting things sorted out I went over to have a word with Bob at Specialist Services again.

He did a beautiful job of welding up the cracked rear end of the guard, not only that but he buffed it back smooth again, and then fixed the nut onto the side.

Once I had it back home it was out with the filler to make good the surface and then paint the guard before it was fitted to the bike.

Velo guard

The Modified Velo Chain-Guard

This left me with the dynamo to do.

While it checked out electrically sound, the drive end bearing was a bit rough so it was a case of getting replacement bearings and fitting them, an easy job.

With the new bearings fitted the drive sprocket was put onto its taper on the armature and tightened  down.

The dynamo was then slid into its housing and the drive chain slipped into place on the sprockets.

Dynamo Chain

Aligning the Dynamo Chain

The dynamo was adjusted side to side until the sprockets were in alignment and the chain free play set.

Before connecting the dynamo to the new, solid state, regulator its output needed checking, and to do this it has to be running at normal speed so preparations for this were made.

There are two outputs from the dynamo, one labelled “F” and the other “D” plus a ground connection made through its casing.

The “F” and “D” outputs were connected together and these joined outputs connected to a headlamp bulb, the other side of the bulb being connected to ground.

Now came the acid test, I had to get the motor running for the first time in some thirty years.

So a half gallon of fuel was put into the tank, the tap set to “Reserve” and turned on.

After giving the carburetter time to fill the choke was set to full on, ignition lever to half-way, valve lifter raised and the motor gently turned over several times to prime it.

Ease over compression and give the traditional “long swinging kick”  – – Nothing.

Tried again, once again nothing.

So I tickled the float for a couple of seconds, primed her again and then the next effort to start her was met with a vicious kick back – – –  AHH, Signs of life! That’s more like it!

Set the advance back a bit more and try again and she was running.

So set the choke to half open, add a bit of advance and then just listen to the noises!

No undue clatters, tappets quiet, all seems as it should be so I shut the throttle and she was ticking over, rather fast but doing it and by now I had the choke off completely so I grabbed a screwdriver and set the throttle stop down a bit then played with it and the pilot air adjuster to get a reasonable tick over, I’ll have to do it properly once I have her thoroughly warmed up but this’ll give a good start point.

So with a feeling of satisfaction of a job well done I shut her down, – – – – and then realised I’d forgotten to check the dynamo output! Typical!.

So I had to fire her up again, only to find that the test light was staying out, the dynamo apparently was not charging so she was shut down again.

Before going any further I checked the bulb was ok using the bikes battery.

As a sidenote here, these old ladies used the old type black, rubber-cased batteries, which were mounted visibly, Panther mounted theirs on top of the rear engine plates, above the gearbox.

To keep the correct period look you can take an old battery of this type, gut it of the old plates and separators to give an empty box and then fit a modern battery inside which is what I have done, in fact to be honest I’m using the one I did previously for the Velo.

There are specialist dealers, such as Burlen , who can supply you with a casing ready modified and already containing a suitable battery.

Anyway, as the dynamo had been standing for so many years it seemed probable that it had lost the residual magnetism it needs to start it charging and that it just needed “flashing”.

To do this I took a lead from the battery positive side having first connected the battery negative to ground.

I fired the bike up again, brought the revs up to a very fast tick over and then just tapped the battery positive lead to the joined dynamo leads. NOTE the connection was literally just made for a fraction of a second and then immediately broken, it was not a permanent connection.

The idea is that the quick power pulse produces a magnetic field in the field coil of the dynamo BUT as the coil only has a low resistance and it is effectively a short-circuit on the battery you cannot leave the connection made.

Once that field is created with the dynamo running, it becomes self re-inforcing and the battery current is not needed, it can in fact cause severe damage if left connected for too long.

This did the trick and with the dynamo charging it was now just a case of connecting it to the regulator, fitting the dynamo chain cover and that was things set for the first ride.

Here’s a look at the old girl in her new clothes ready to go out on the town.

Right hand side

Timing Side View

Left Hand Side

Drive Side View