
I’ve now got some 300 miles up on the old girl and it’s time to make the initial running adjustments, a 300 mile service as it were, but I’ll leave the initial oil change till just before I put her away for the winter or 500 miles, whichever comes sooner.
Most of these are obvious ones, valve clearances, chain adjustments, cable free play and such, but one set are not, the front forks.
After the Second War there was an almost universal adoption of the hydraulicly damped telescopic fork for front suspension on bikes.
Previously there had been several options but probably the most common was the “parallel ruler” type or “girder fork”.
In the late 1930’s Panther did not make their own forks but bought them in from “Webb”, probably the best known of the proprietary manufacturers. For the Model 100 they used Webbs “HeavyWeight” fork, similar to that pictured below which shows the fork as intended for use on a Velocette motorcycle. This is taken from the “Webb” catalogue of the time, which I have lifted from the “Velobanjogent” website HERE

Webb Girder Forks
This pivots on four spindles, two running in the yokes and two in the fork girder, the spindles being joined by pairs of links, the illustration below shows the layout, here in a different fork model and again taken from the same catalogue.
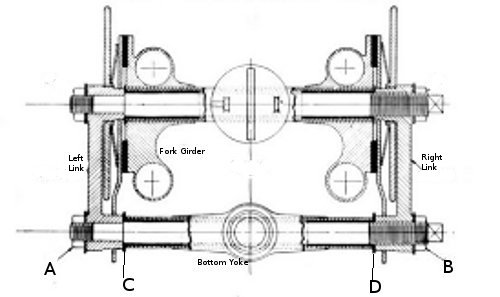
Webb Links Set Up
What needs to be adjusted is the freeplay of the spindles, if it is too tight the links are pulled tight against the yoke and the fork girder and the fork becomes locked up but if too slack then the girder can move side to side to the detriment of the handling.
As you can see the right link has the spindle threaded into it while the left one is plain and locks up against a shoulder on the spindle, adjustment is by threading the spindle further into or out off the right link.
To gauge the free play there are a pair of knurled washers at “C” and “D”. Adjustment is correct when one of these is held firm by the link but the other can be rotated, that means there is minimal free play in the joint.
When I rebuilt the old lady I had the forks refurbished by Percival and Webb down in Birmingham. However now they have a few miles on them things have settled in and they now need adjustment, a bit of excessive free play having appeared.
To make the adjustment one end of the spindle is squared to take a spanner, however I prefer to use a tap wrench here as I find it gives better control.
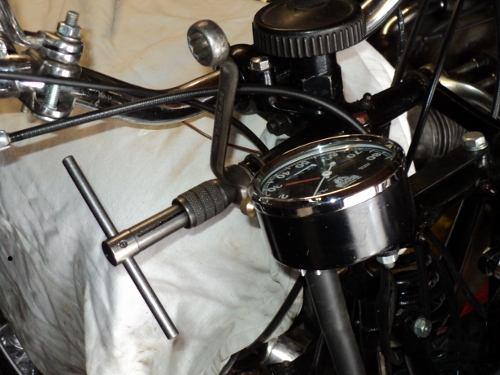
Adjusting top rear spindle
The adjustment technique is not quite as obvious as it seems, first you slack off both the locknuts “A” and “B” and make your adjustment of the spindle.
You the tighten locknut “B” followed by “A” and then you check the play, if it’s right all well and good, if not try again. It’s a bit fiddly but you soon get the feel for it.
If you try to set the play without retightening “B” each time, and then locking it up afterwards you’ll find things set too tight because when you pull up on “B” it moves the link a fraction inwards on the threads by enough to take out the freeplay you have just so carefully set! Experience speaking here!.
Once you have one spindle set then you move onto the next until you have all four set.
Since the spindles are working in plain bushes you need to keep them well lubricated, this means regular greasing with the inevitable result that there is excess grease appearing at the links that you need to clean up, don’t just leave it as there is a friction damper as part of the lower right link and you definitely do not want any grease to find its way in there!.
Back in the day a standard part of the manufacturers tool kit that was supplied with the bike was a small grease gun, about 6 inches long, intended for this very job.