
Next thing is “Just take the barrels off”. Sounds so easy – BUT first you need to drain down the cooling system, on both sides!, next remove the water hoses to get some room to work, labelling everything so it can go back in the same place.
Next is to remove the carburetter, relatively simple job but space is limited, followed by removing the inlet manifold, 4 small nuts, each placed close to the manifold tube and easy to drop!.
Now it’s just remove the exhausts, but these are not only held onto the barrels by 2 small bolts each but the pipes have to be persuaded to come out of the silencer box as well.
All this went to plan, no problems.
So start with the easy one and take off the left cylinder head.
The heads are each held on with 6 studs, ¼ inch BSF, nothing fancy so ease them of a little at a time till they spin off free. Book now says to take hold of the head and slide it off the studs but the head has not read the book!.
The head will not budge, first thing is to try jarring it off with a rubber hammer, no joy so try with the hide/copper mallet, still no movement.
Before getting violent I decided to remove the head and barrel as a unit so it’s undo the 5 barrel hold down nuts and slide the barrel off the piston, remembering to catch the piston as it drops from the barrel!.
Now I have the barrel and head in my hands I can get a bit more “creative”. Using the shaft of the hammer down the barrel I try to knock the head loose with no apparent effect till a closer look shows that the head has moved a little down the studs and that whoever rebuilt the engine last time had used a gasket cement on the head gasket. Not only had this stuck the head to the barrel but it had squeezed into the stud bores and glued these as well, I’m afraid the air went a little blue at this discovery and the previous mechanics ears must have been burning!.
Once I finally had them apart I had to clean the head joint faces of the remains of the glued on gasket. As the cylinder head is aluminium alloy I had to be careful not to damage it while scraping off the old gasket, I wound up taking the blade out of a Stanley knife and using that almost as a plane to peel the gasket off the alloy, certain blessings were pronounced while doing this but eventually the joint face was clean.
The barrel was easier to clean because it’s made from cast iron and so is less liable to damage when cleaning it. To make the job easier I removed the cylinder head studs, or anyway the 5 of them I could get to come out. (On both barrels the stud nearest the exhaust port would not come out.)
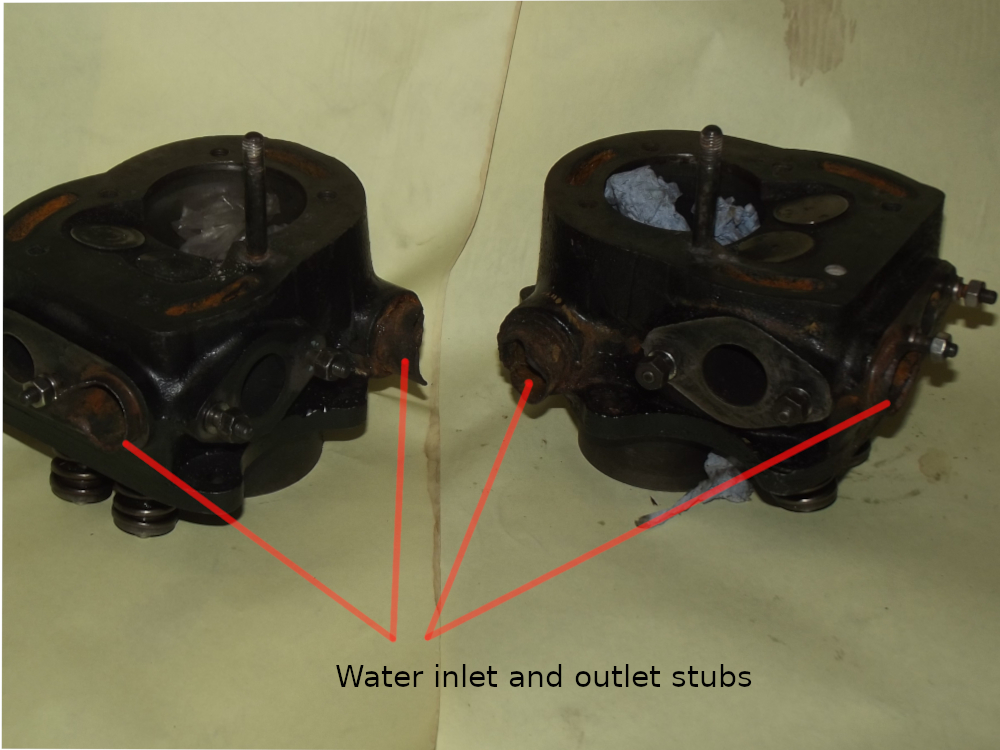
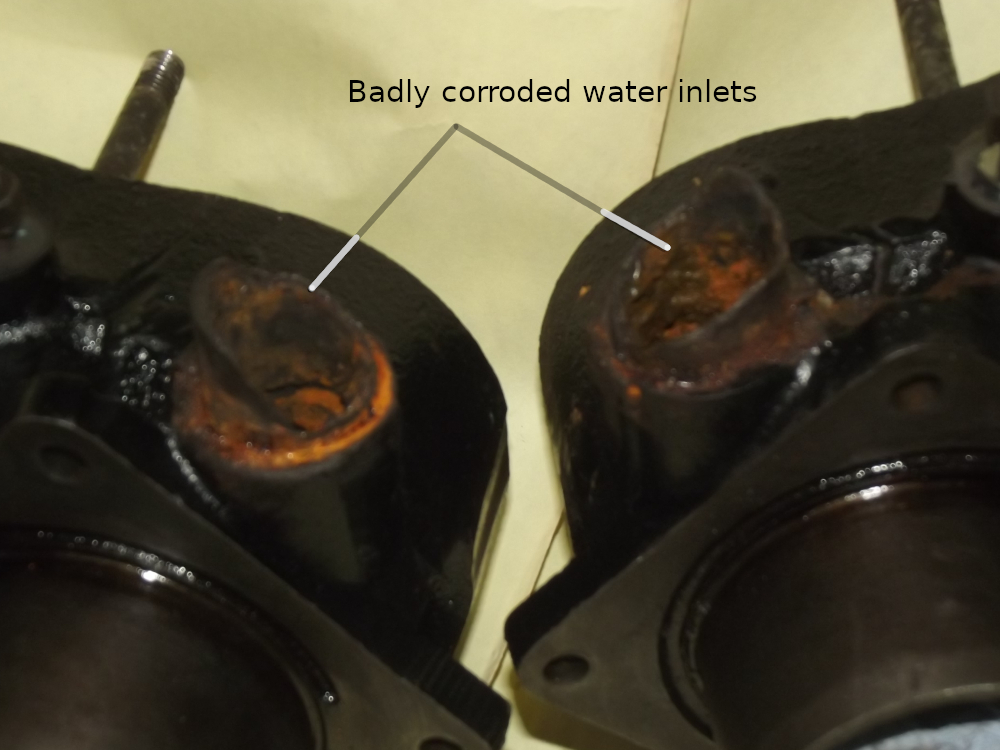
This was the barrel with the bad water pipe and I could now get a good look at it, it was a testament as to how corrosive water is and it showed just how little overlap between a stub pipe and the water hose is needed for a watertight joint, there was only about 1/16 inch of it left on one side!
I decided to call it a day and finish the job later, Mañana after all.
Next job is a repeat performance on the right hand side, only difference is that the oil filter has to be taken off the head first.
Once I’ve got this head and barrel cleaned up then I just have to parcel the barrels up and post them off for repair.
While I’m awaiting their return I can clean up the joint faces on the crankcases ready for the repaired barrels and order up the new gaskets etc that I’ll need for the job.