I’ve been up to Halfords and got some antifreeze and found a little ploy. They are listing antifreeze concentrate at £4.49 per litre, distilled water to make it up is £2.00 per litre, that’s £6.49 for 2 litres of mix. A 2 litre bottle of ready mix is £10.49, not a bad mark up!, but then you find there are no litre bottles of the concentrate in stock!!.
So, the other car shops round here having put up the shutters I had to get the readymix.
Anyway it was back to the bike and fill the radiator, leave for 5 minutes and check round for leaks.
Now the acid test! Petrol turned on, set the choke, put the key in and turn on the ignition, ammeter shows a discharge so battery is connected the right way round, turn the engine over a few times to get the fuel through to the cylinders and then give her a kick, try again and it feels like she’s trying to start, and again – nothing, try a few more times without result and notice the warning light is out and ammeter on zero – battery was flat!.
As I’d just charged the battery overnight it meant the battery was shagged so it was a case of turn off the fuel, take off the battery and put the bike away.
Once I was back in the house I went on net to Tayna Batteries, by now it was after 6.00pm but I put a new battery on order through their systems.
I received an acknowledgement the next morning with a tracking number for the order and I had the battery in my hands by lunchtime the next day!.
Out into the garage and fit the battery, fuel on, choke on, turn her over a couple of times, ignition on, kick and she’s running, open the gas a bit and nothing happens ????? then light dawns, I take the choke off and I’ve throttle response, as revs increase the ammeter moves from discharge to charge, lights and horn work, oil pressure showing in the 20 – 30psi range, so things seem right.
I’ll leave it till tomorrow for a trial run as I need to get her taxed first.
Parts arrived today, not bad, only a weeks turn round time, so it’s on with the job!.
The Velo special spanner made snugging up the barrel base nuts a doddle!, wish I’d had it when taking them off!, not only that but it doubles for removing the magneto mounting nuts on the big Velo!.
Once I had both barrels snugged down I had to reset the tappet clearances. This meant taking off the inspection covers to get at them. Valve clearances on these engines is 4thou on the inlet and 6thou exhaust at TDC. As one turn of the adjuster is 38thou you can set the inlet to about 2/3 of a flat open on the adjuster , nip it up, check it with a feeler gauge and if OK then lock it down. For the exhaust you set 1 flat open and then check, spanner access to the tappet lock nuts was poor so I dug out the obstruction spanners used for doing the Panther’s tappets. Have to try and get some better quality ones though, the Panther ones are simply cut from ¼ inch sheet and are a bit crude.
Next was refit the exhausts, bit fiddly but no problems.
I refitted the cylinder head studs, these had been removed to send the barrels away to have the water stubs replaced, and then put the heads back on, but while I had them off I took the opportunity to check the ignition timing — points opening at TDC on full retard –, while there is a marking on the flywheel for TDC, because the flywheel is not keyed onto the crankshaft the accuracy of this depends on the workmanship of the person who last refitted the flywheel. Since the ignition is really a flywheel magneto this setting is important, the fact that Veloce did not key the shaft suggests they did not fully trust the accuracy of manufacture of Miller, who supplied the system, as neither the flywheel or the ignition advance unit are keyed.
Onto the home straight now! Just refit the inlet manifold and carburetter put on the water hoses and all that’s left to do is refill the radiator. It’s now into October so that’ll have to wait until I can get some antifreeze.
Since I do at least have a pair of cylinder base gaskets among the bits and pieces that came with the bike I can get started putting her back together.
First thing is to clean the crankcase faces where the barrels mount so it’s a case of getting in there with a cloth and some Panel Wipe to give a clean metal surface.
The barrels themselves need the same treatment and then the greased gasket put in place on the barrel. I know the obvious is to put them onto the studs on the crankcase but that would have the base cover plates lying on top of the greased gasket and the plate acts as a support for the piston while fitting the barrel.
The bores were wiped clean and then given a wipe of oil, slipped over the pistons and slid home onto the case studs.
Access to the nuts on these studs is awkward, Velo supplied a special spanner for the job, which I don’t have of course so it’ll need to go onto the parts order so until that comes I’ll just spin the nuts on finger tight and await delivery.
Today is Tuesday 14th September, I got back from walking the dogs this morning to find a note poked in the back door.
It was from ParcelForce telling me they’d tried to deliver a package while I was out and that I could pick it up from the local post office “after 1.00 pm”.
I went and picked it up and sure enough it was the LE cylinder barrels back, they’d been received at 3.01pm on Thursday according to the ParcelForce tracker and here they were back on the Tuesday morning, now that’s service!. It also shows how having the correct tooling to do a job can make it quick and easy.
Unfortunately I’ve not yet heard back from the LE Velo Club about my membership and until I have a member number I cannot use their Spares Scheme, I’ve a shopping list here ready to go as soon as I have that number!, mainly gaskets but I need those to re-assemble the engine.
In the meantime I’ve been having a look at making a fixing strap for the battery. The pukka strap is a piece of bent steel strip. I’d measured up and got as far as making the proverbial cardboard template when I had second thoughts, “Why not pinch the idea from BMW and secure the battery in place with a rubber strap?”.
I can remember that on my old R50 BMW there was a rubber strap over the top of the battery to secure it and I’d never had any problems with it so let’s have a look and see what’s needed.
I’ll need two frame anchor points, well there are the two points where the maker’s strap was fixed so it just means making up a pair of anchor hooks for the strap, not difficult, so what about the strap?.
The strap can be made from bands cut from an old inner tube, if I put them through a length of electrical braided sheathing that will give a more “professional” look to the job and anyway since it is under the saddle, while it can be seen it’s not out on open display as it were.
Details? A double hook is needed on the bike, one on either side of the battery. The ends of the rubber strap are looped over a short length of 4mm rod so the hooks go over the rod, on either side of the strap. I’ll need to glue the strap to get the correct length but I can either use “Super glue” or the glue from a puncture outfit for that.
When I took the barrels off I found that it would have been easier if I had had some “LE specific” tools, a 10mm plug spanner, a 2 BA box spanner and a 2 BA open ender, and a “special” for the cylinder base nuts.
While the special will have to come from the LE club I’ve been “on web” and sourced the others, while I don’t have any 2 BA spanners a 1/8 Whitworth is very near on size, close enough if the nuts are not too tight.
I’ve also found in my stash a 1/4” drive socket that will fit the base nuts and if I trim the length a bit and use a wobble bar it will do the job of the special base nut spanner nicely.
I’ll also need some ¼” BSF taps and a die to clean the cylinder head studs and nuts, better get some 2 BA as well so a call to Tracy Tools is on the cards as well.
I sent the two barrels off to have the water stubs replaced middle of last week, Parcelforce tracker says they were delivered Thursday afternoon, so it’s now a case of waiting for them to come back.
I’ve sent off for membership of the LE Velo Club so I’ve now to await their acknowledgement to be able to order up some spares.
Among the gen I got with the bike however was a spare parts book so I’ve been sorting out what I need, but I have to wait for their official order form before I can send the order in.
The little beasty is currently sitting in the garage minus her cylinders and there’s not a lot I can really do until I get them back.
One thing to sort out is the battery though. The LE has a 6-volt system. Originally the battery would have been the old rubber-cased type but these are not readily available now. The usual trick is to use a smaller modern AGM battery inside the case of one of the old type batteries and I’m in luck here in that I have such a case “on the shelf”, a bit battered but useable, and the battery the bike came with WILL fit into it.
I’ll just need to make up a top strap to secure the battery in place under the saddle so there is a job that needs doing.
The battery that came with the bike may be a problem however as it was stone flat when I got it. I have charged it up however and it’s been standing a couple of days now to see if it holds it’s charge, running a battery right down is an acknowledged way to knacker it after all.
Next thing is “Just take the barrels off”. Sounds so easy – BUT first you need to drain down the cooling system, on both sides!, next remove the water hoses to get some room to work, labelling everything so it can go back in the same place.
Next is to remove the carburetter, relatively simple job but space is limited, followed by removing the inlet manifold, 4 small nuts, each placed close to the manifold tube and easy to drop!.
Now it’s just remove the exhausts, but these are not only held onto the barrels by 2 small bolts each but the pipes have to be persuaded to come out of the silencer box as well.
All this went to plan, no problems.
So start with the easy one and take off the left cylinder head.
The heads are each held on with 6 studs, ¼ inch BSF, nothing fancy so ease them of a little at a time till they spin off free. Book now says to take hold of the head and slide it off the studs but the head has not read the book!.
The head will not budge, first thing is to try jarring it off with a rubber hammer, no joy so try with the hide/copper mallet, still no movement.
Before getting violent I decided to remove the head and barrel as a unit so it’s undo the 5 barrel hold down nuts and slide the barrel off the piston, remembering to catch the piston as it drops from the barrel!.
Now I have the barrel and head in my hands I can get a bit more “creative”. Using the shaft of the hammer down the barrel I try to knock the head loose with no apparent effect till a closer look shows that the head has moved a little down the studs and that whoever rebuilt the engine last time had used a gasket cement on the head gasket. Not only had this stuck the head to the barrel but it had squeezed into the stud bores and glued these as well, I’m afraid the air went a little blue at this discovery and the previous mechanics ears must have been burning!.
Once I finally had them apart I had to clean the head joint faces of the remains of the glued on gasket. As the cylinder head is aluminium alloy I had to be careful not to damage it while scraping off the old gasket, I wound up taking the blade out of a Stanley knife and using that almost as a plane to peel the gasket off the alloy, certain blessings were pronounced while doing this but eventually the joint face was clean.
The barrel was easier to clean because it’s made from cast iron and so is less liable to damage when cleaning it. To make the job easier I removed the cylinder head studs, or anyway the 5 of them I could get to come out. (On both barrels the stud nearest the exhaust port would not come out.)
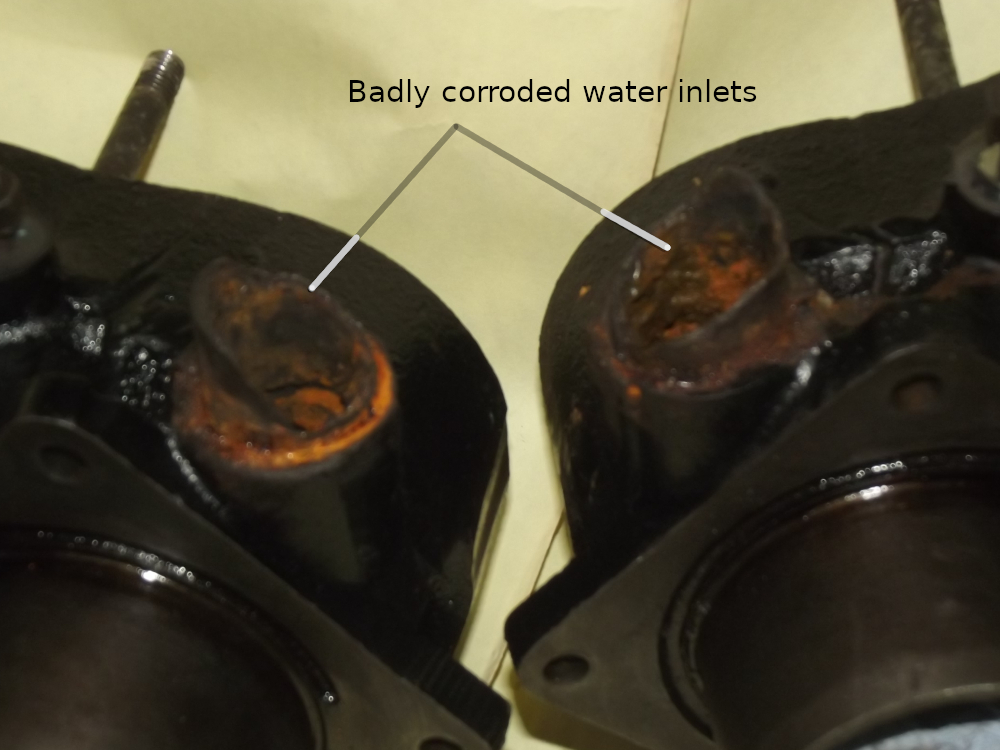
This was the barrel with the bad water pipe and I could now get a good look at it, it was a testament as to how corrosive water is and it showed just how little overlap between a stub pipe and the water hose is needed for a watertight joint, there was only about 1/16 inch of it left on one side!
I decided to call it a day and finish the job later, Mañana after all.
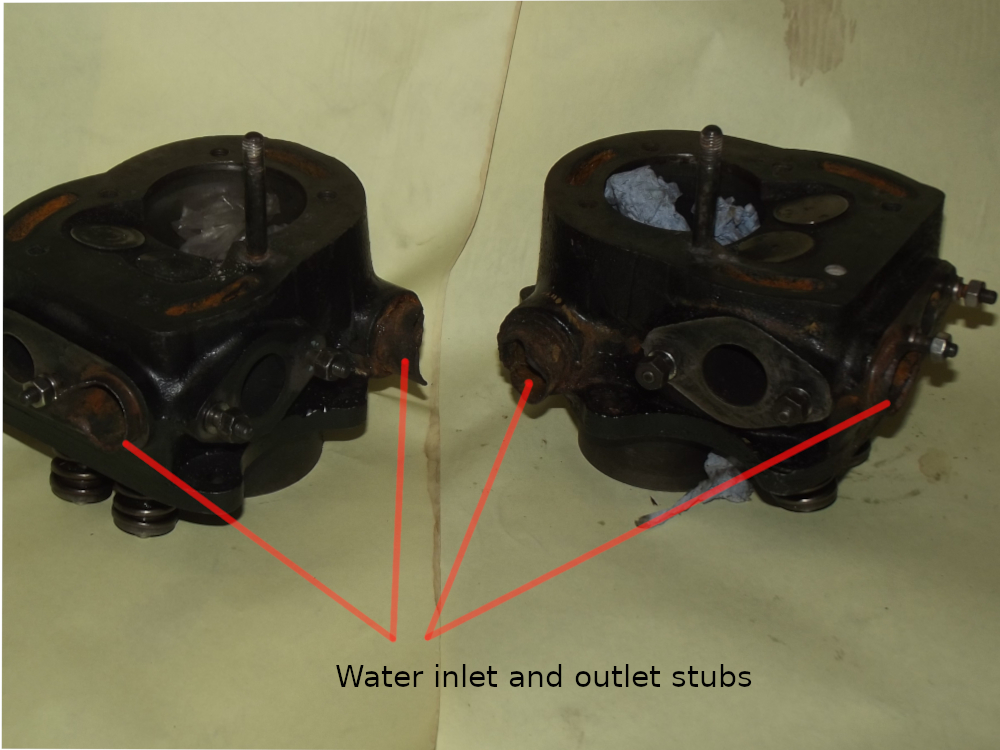
Here’s a look at the barrels to show you the water inlet and outlet stubs.And this shows the inlets in close-up , these stubs should stand 3/4 inch proud of the barrel
Next job is a repeat performance on the right hand side, only difference is that the oil filter has to be taken off the head first.
Once I’ve got this head and barrel cleaned up then I just have to parcel the barrels up and post them off for repair.
While I’m awaiting their return I can clean up the joint faces on the crankcases ready for the repaired barrels and order up the new gaskets etc that I’ll need for the job.
A problem I was aware of when I took on the LE was that there was a water leak.
When I investigated further I found that the problem was not simply a badly made connection but that of a corrosion damaged water inlet pipe on one of the barrels, after all the bike is around 60 years old now.
There are four of these stubs, an inlet and an outlet on each barrel.
Fortunately these are not cast as part of the barrel but are simply a short length of tube, made as a press fit into the main barrel casting.
Having found one bad stub I checked the other three and found that “If doing one better do them all”.
While it is quite possible for you to replace these yourself there is an LEVelo club member who offers this as a service at a very reasonable price, in fact when I ‘phoned him for more information he quoted me a price for doing both that I thought was for fixing just one barrel!
This means its not worth going to the trouble of making the tooling necessary for the job and turning up the new stubs.
It does mean however that I’ll have the bike standing in the garage with the engine open for a while, not the best of ideas. The easy way round this is to make up a pair of blanking plates to cover the crankcase mouths and keep any muck out. Not only that but they can support the pistons in place while the barrels are being refitted rather than me having to support the piston with one hand, the barrel with the other and using a third hand to compress the piston rings into place in the barrel as I slide it into place.
To get the material for these plates I went down to Maxwells DIY in Birtley, had a rake in their offcuts box and came away with a nice piece of 4mm plywood.
Once I got back home I dug into the bits and pieces that had come with the bike and found a cylinder base gasket.
This was laid onto the plywood, drawn round and the holes marked out. I then set to and sawed the required two plates out of the plywood.
The hold down bolts for the cylinders are ¼ inch diameter so I drilled the holes in the plates out to 8mm, near enough 5/16 inch.
I then marked the centre of the bore and drilled a 12mm hole there and opened that up to the top edge so that I had a slot running from the top edge to the bore centre, this was to take the connecting rod, idea being that with both plates in position, by turning the engine I could bring both pistons down to lock the plates in position against the crankcase and seal the cases shut while the barrels were away being fixed.
That was the easy bit done, next comes the grovelling to the machine gods.
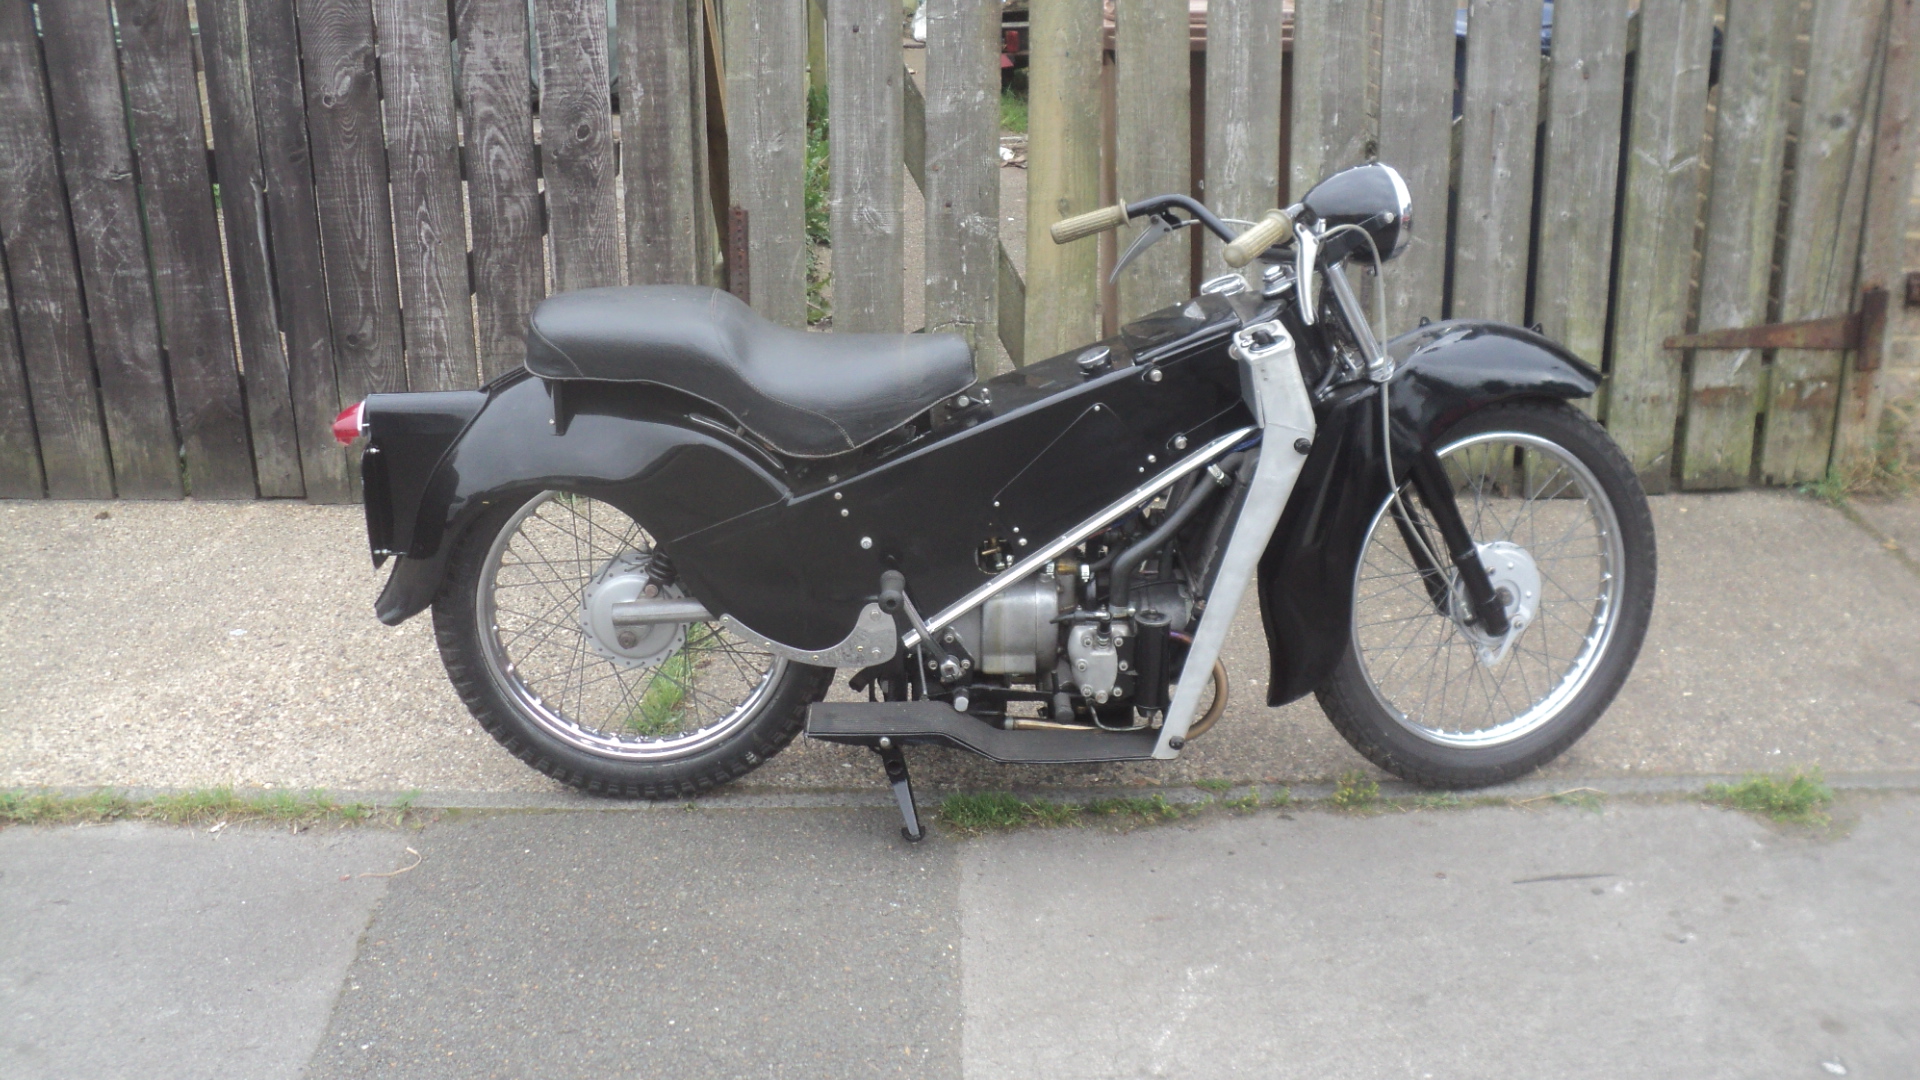
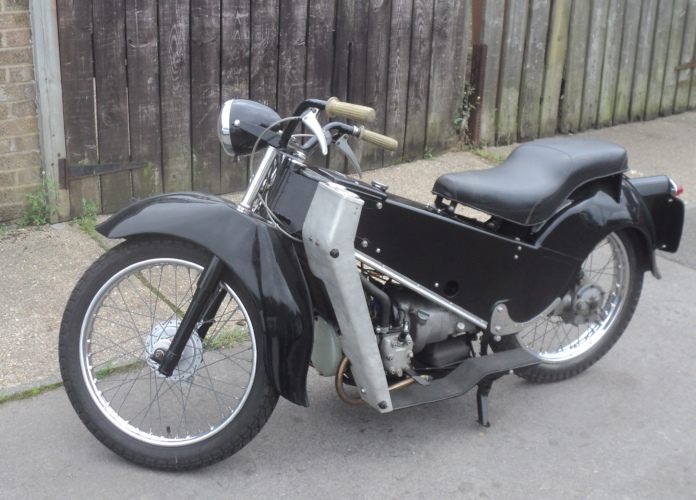
I’ve now got the little Velo back home, here’s a look at her.
As you can see she is in very nice condition.
I’ve had a closer look at her now and it seems that she is a hybrid, a MkIII power unit fitted to a MkII chassis so she has the earlier front forks, wheel and headlamp married to the later engine, gearbox and rear end.
This means I’ve a full-width rear and a half-width front hub fitted. The front wheel is a 19inch diameter while the rear is an 18 inch but the front tyre is a 3.00 inch and the rear a 3.50 so that evens up ok.
Her battery is shagged so that means a new one goes on order, I can’t pinch one from one of the other bikes because they are all on 12 volt systems and this old lady runs on 6 volts.
As about the only source of spares is through the owners club I’m going to have to sign up to it, well that’s the same situation I have with the old Panther so it just means that I’ll be a member of yet another club! So I’ve downloaded the membership application form from their website, filled it in and posted it of.
I can also get the workshop book, owner’s manual and spares book through the club so that’s going to be useful as well.
Well, I’ve been and gone and done it, I’ve got myself a “new” bike.
About 40 years ago I had an LE Velocette, yes, a “noddy bike”.
I know they are not fashionable and can be the subject of derision but that little beast proved itself to be a solid little bike and one that had the quality of build and handling you expect of a Velocette.
So why did I sell it?, quite simply someone made a stupid offer for it, one which I at that time could not afford to turn down but it left me with an affection for the little beasts.
For a while now I’ve had the yen to get another and when I recently heard of one available near me I decided to look it up.
I’ve been over and had a look at it and it appears to be in a better state than I expected, even than I had hoped!.
It’s in very nice condition. According to the book, to start them you turn on the fuel, turn the engine over a couple of times to get the fuel through to the cylinders, yes it’s a twin!, switch on, press down on the starter and it should start and that’s exactly what happened!, despite it having a flat battery that had only been on charge for some 10 minutes.
It looks to be an early MkIII model as it has the later 4 speed gearbox with footstarter. This came in with the MkIII, earlier models having a hand lever starter and a three speed hand-change gearbox so it’s a pretty good indicator as to the Mk.
However the MkIII has the speedo mounted in the headlamp shell and this one has it mounted on the top of the left leg shield, as was done on the Mks I and II and it has the earlier fork assembly so it may be one of the transition bikes.
Last time I was out on the Velo I found that there was no charge registering. Once I got back home I found that the problem lay within the generator.
I still had the original generator on my Velo, a 6-volt Miller dynamo, which is very similar to the Lucas units more commonly fitted to most British bikes in the immediate post-war period.
These were a slightly upgraded version of the units fitted back in the late 1920’s which put out all of 36 watts at 6 volts!. The newer dynamos put out a nominal maximum of 60 watts reducing to about 45 watts at town riding speeds. This means that even with the newer unit the standard lights are low powered and give, at best, a 6-volt 36 watt headlamp!!.
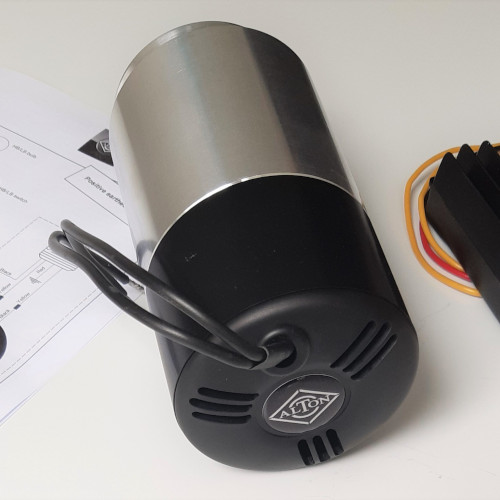
Miller Dynamo
They are normally a fairly reliable unit but mine is now over 50 years old and has given up on life so I decided to bite the bullet and rather than having it rebuilt I would upgrade and fit a more modern unit.
There is a French made replacement for these old style dynamos which is a direct replacement dimensionally for the old dynamos and so will fit in the existing dynamo cradle and use the existing drive and give double the output. While these units are not cheap, nor is the cost of a rebuild of a dynamo and when you take the benefit of decent lights and add that to the cost of a dynamo rebuild then things seem much more reasonable.
Alton Generator
So I contacted my Velo parts supplier and ordered one of these “Alton” units, because it is an alternator rather than a dynamo it also requires a regulator/rectifier unit but this came as part of the package and is a standard “Podtronics” unit rather than a special so that fact may be useful later as I can also use it on the big Panther by changing the drive pulley.
Despite the postal hold ups it was delivered within two days, now I’ve just to get round to fitting it!!.
Owing to monsoon conditions this was put off for a while but did not prove difficult.
First thing was to disconnect the battery before starting to remove the old dynamo.
I removed the drive belt cover (for those not familiar with a Velo the dynamo is driven by a V-belt off the engine shaft shock absorber). Next was to slacken the nut on the end of the dynamo shaft before removing the drive belt.
Next off was the dynamo drive pulley, this has to come off because otherwise it blocks the removal of the belt drive inner cover which is next to come off, and then there’s only the dynamo clamping bolt to loosen off and the dynamo can be slid out of its cradle, not forgetting to undo the wiring cables from the dynamo.
The ‘Alton’ unit can now be slid into the cradle in place of the Miller and the belt inner cover fitted and the drive pulley fitted.
It is important to get the drive pulleys in line, otherwise you’re liable to have the belt jump the pulley or, at best, wear badly. Simple way to do this is to take a length of 6mm round bar and put a right-angle bend a couple of inches from one end.
If you now hook this into one of the pulleys then the free length gives straight line along the required drive line and so can be used to line up the two pulleys.
Once the pulleys are in line then all that’s left here is to fit the belt and set its tension by rotating the generator in its cradle.
Now we get complicated, it’s time to fit the reg/rec unit.
On the later Velos such as mine the regulator is fitted onto the rear mudguard, under the saddle and, nicely out of the way.
Looking for somewhere unobtrusive to mount it I settled – – – – on the rear mudguard under the saddle, where the original unit lived.
This has the advantage that I can utilise the existing cabling to connect the reg/rec into the bikes systems.
There are a pair of leads from the generator which match up to two of the leads from the reg/rec.
Of the other two leads from the reg/rec, one goes to the main ground point, which is under the tank anyway and the other is the power lead going up to the main switch.
Once everything was connected up and checked all to be working that was it and I now have the advantage of being able to run a decent headlamp rather than having to rely on just a time-served glow-worm in a jar.
Why did I go for the upgrade?. Well the Velo is still a practical road machine, it was about the top rated sports bike of its generation and is still well capable of coping in modern traffic. Its weak point was the low powered 6 volt lighting system.
With this new generator I now have a 12 volt system with good lights, in fact because the bike has a magneto and so no power demand to run an ignition system, I have power and to spare to run a spotlight as well if I so wish.
Before the conversion, if I was out with lights on I needed to really be above 40mph to keep the battery charged, riding at lower speed, as in towns, meant the loads did not balance and the battery would gradually drain down. Not only that but the lights were low powered, now I happily run a standard QH headlamp and can SEE where I am going after dark.